
Subscription Preferences Widget

The Subscription Preferences Widget is an embeddable component that allows your users to manage their email subscription preferences without leaving your website. Users can subscribe/unsubscribe from email lists, cancel active sequences, and globally opt-out of all communications.

Preview

Here’s what the widget looks like when embedded in your application:
Subscription Preferences Widget
The widget displays:
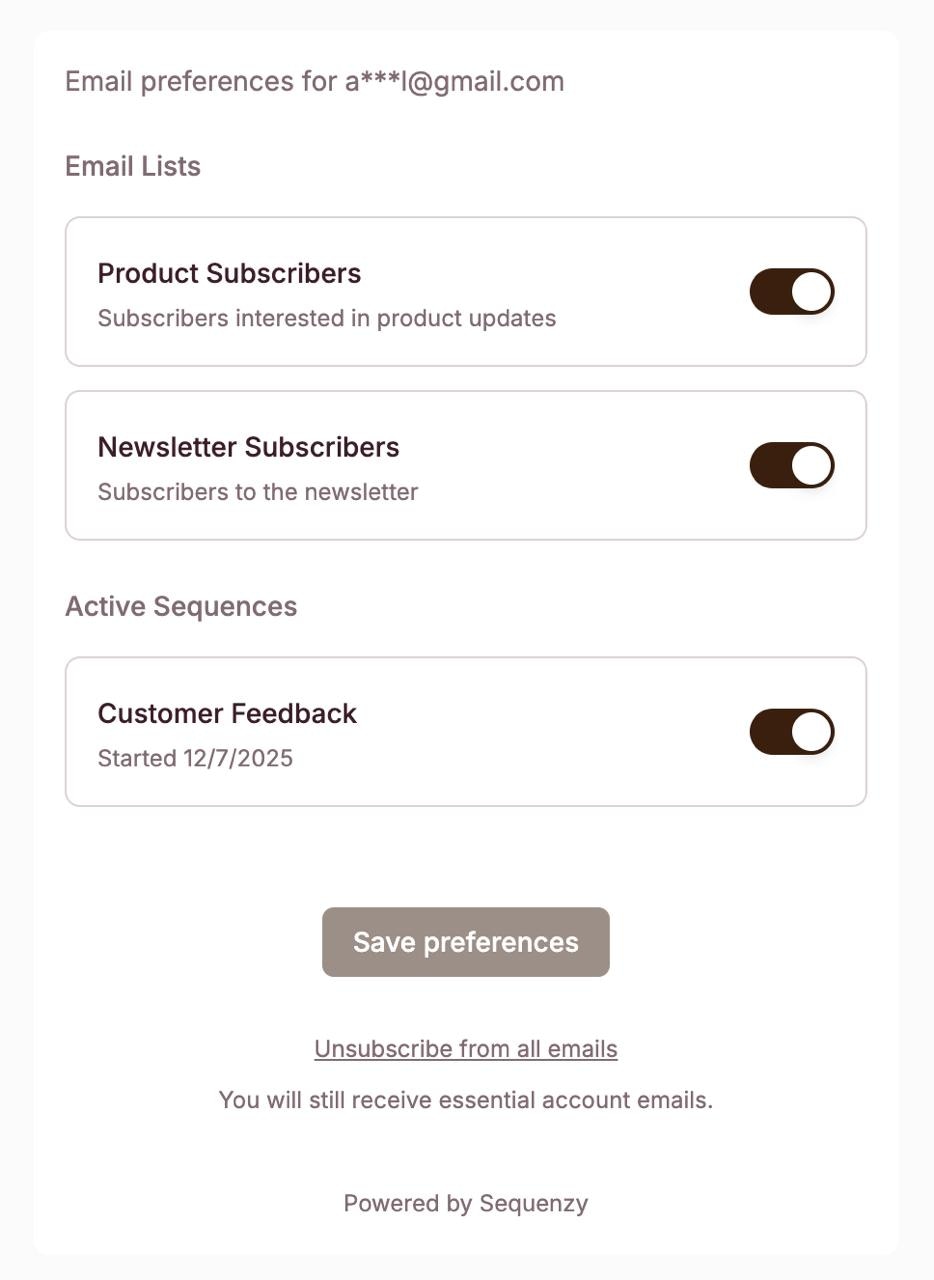
  • Email preferences header with the subscriber’s masked email address
  • Email Lists section with toggles for each list the subscriber belongs to
  • Active Sequences section showing any running automations with start dates
  • Save preferences button to submit changes
  • Global unsubscribe link to opt-out of all communications

Features

List Management

Users can toggle subscriptions to individual email lists

Sequence Control

Cancel active email sequences (automations) at any time

Global Unsubscribe

One-click option to opt-out of all communications

Auto-Resize

Widget automatically adjusts height based on content

How It Works

The widget integration consists of two parts:
┌─────────────────────────────────────────────────────────────┐
│                     Your Application                         │
│                                                              │
│  ┌─────────────────┐      ┌────────────────────────────┐    │
│  │   Your Backend  │      │       Your Frontend        │    │
│  │                 │      │                            │    │
│  │  1. Get Token   │─────>│  2. Render iframe with     │    │
│  │     from API    │      │     token parameter        │    │
│  └────────┬────────┘      └────────────────────────────┘    │
│           │                                                  │
└───────────┼──────────────────────────────────────────────────┘


┌─────────────────────────────────────────────────────────────┐
│                       Sequenzy API                           │
│                                                              │
│    POST /api/v1/widgets/preferences/token                   │
│    Returns: { success: true, token: "eyJ..." }              │
│                                                              │
└─────────────────────────────────────────────────────────────┘
  1. Backend: Call the Sequenzy API to get a signed token for the logged-in user
  2. Frontend: Embed an iframe with the token to display the preferences UI

Quick Start

Step 1: Get an API Key

Navigate to Settings → API Keys in your Sequenzy dashboard to create an API key.

Step 2: Backend - Get Token

Create a server-side endpoint that fetches an embed token from Sequenzy:
import Sequenzy from "sequenzy";

const client = new Sequenzy(process.env.SEQUENZY_API_KEY);

app.post("/api/preferences-token", async (req, res) => {
  const userEmail = req.user.email;

  const { data, error } = await client.widgets.preferences.generateToken({
    email: userEmail,
  });

  if (error) {
    return res.status(400).json({ error: error.message });
  }

  res.json({ token: data.token });
});
Security: Always call the Sequenzy API from your backend. Never expose your API key to the frontend.

Step 3: Frontend - Embed the Widget

Fetch the token from your backend and render the iframe:
"use client";

import { useState, useEffect } from "react";

export function EmailPreferences() {
  const [token, setToken] = useState<string | null>(null);
  const [loading, setLoading] = useState(true);

  useEffect(() => {
    async function fetchToken() {
      const res = await fetch("/api/preferences-token", { method: "POST" });
      const data = await res.json();
      setToken(data.token);
      setLoading(false);
    }
    fetchToken();
  }, []);

  useEffect(() => {
    // Handle iframe resize messages
    const handleMessage = (e: MessageEvent) => {
      if (e.data.type === "sequenzy-preferences-resize") {
        const iframe = document.getElementById(
          "sequenzy-preferences"
        ) as HTMLIFrameElement;
        if (iframe) iframe.style.height = e.data.height + "px";
      }
    };
    window.addEventListener("message", handleMessage);
    return () => window.removeEventListener("message", handleMessage);
  }, []);

  if (loading) return <div>Loading preferences...</div>;
  if (!token) return <div>Unable to load preferences</div>;

  return (
    <iframe
      id="sequenzy-preferences"
      src={`https://sequenzy.com/embed/preferences?token=${token}`}
      width="100%"
      height="400"
      frameBorder="0"
      style={{ border: "none", maxWidth: "500px" }}
    />
  );
}

Auto-Resize

The widget automatically sends resize messages when its content height changes. Add this listener to your page to automatically adjust the iframe height:
window.addEventListener("message", function (e) {
  if (e.data.type === "sequenzy-preferences-resize") {
    var iframe = document.getElementById("sequenzy-preferences");
    if (iframe) iframe.style.height = e.data.height + "px";
  }
});

Widget Sections

The widget displays the following sections based on the subscriber’s data:

Email Lists

Shows all email lists the subscriber is associated with. Each list has a toggle to subscribe or unsubscribe.

Active Sequences

If the subscriber is currently in any automated email sequences, they’ll see a list of active sequences with the option to cancel each one.

Global Unsubscribe

A prominent button at the bottom allows users to opt-out of all communications at once.

Styling

The widget uses a clean, minimal design that works well in most applications. The “Powered by Sequenzy” footer is shown for free tier accounts and can be removed by upgrading to a paid plan.

Error Handling

The token endpoint returns specific error codes to help you handle edge cases:
StatusError CodeDescription
400VALIDATION_ERRORInvalid email format
401UNAUTHORIZEDInvalid or missing API key
404NOT_FOUNDSubscriber not found in Sequenzy
500SERVER_ERRORServer configuration error
If you get a 404 error, ensure the subscriber exists in Sequenzy before requesting a token. Use the Create Subscriber endpoint to add them first.

Best Practices

  1. Add to account settings: Place the widget in your user’s account or settings page
  2. Handle loading states: Show a spinner while fetching the token
  3. Handle errors gracefully: Display a friendly message if the widget fails to load
  4. Use auto-resize: Implement the resize handler to prevent scrollbars
  5. Secure your endpoint: Ensure only authenticated users can request tokens

API Reference

For detailed API documentation, see: